DIY Advent Calendar
- Coloured tissue paper
- Elastic bands
- Poster tubes
- Ribbon
- Stickers
- Tarpaulin
You can easily whip up your very own advent calendar with a few materials and put your own selection of treats, toys and other goodies inside. It’s really simple to put together and adds a breath of fresh air to your existing arsenal of festive decorations, which makes it the ideal project for a rainy winter afternoon.

Start by measuring and marking your poster tubes. You’ll want to make all of the individual units the same size, but the size you make them is entirely up to you. They can be as small or as large as you want, so you can make them to suit any space.

Once they’re all marked, cut them to size using a mitre saw.

Clear yourself a workspace and lay down a tarpaulin to help protect your room from any mess.

If you don’t have a mitre saw, you can cut the tubes by-hand with a good pair of scissors.

Once all your cutting is complete, paint all your units individually with festive colours of your choice.

Once they’re all dry, you can stick them together using a glue gun.
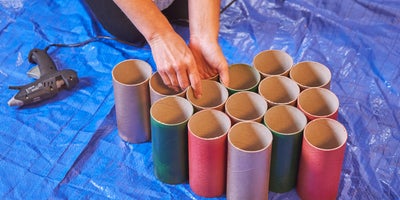
You can arrange them in whatever pattern you want- a Christmas tree is easily achievable with the 25 units you have. Allow some time for your glue to dry.

Once you’ve got your calendar assembled, why not add a final decorative touch by gift-wrapping it with ribbon.

To countdown the days until Christmas, put numbered stickers on the lids of the poster tubes and pop them in-place.

Don’t forget to wrap up your treats in tissue and place them inside your calendar.

And that’s a wrap! Your advent calendar is ready for December.
